
ororo Heated Apparel Troubleshooting Guide
Having trouble with your ororo heated apparel? No worries, we've got you covered! Our troubleshooting guide is here to assist you in resolving the issues you may encounter with your heated gear. Follow the steps to resolve the product issues and ensure your gear works perfectly, providing you with the warmth and comfort you love. Let's get you back to enjoying the great outdoors in style!
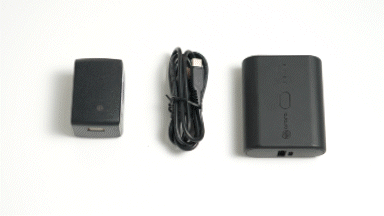
Step 1: Identify your heated apparel and its compatible battery pack.
Step 2: Check if the charger and cable are functioning properly.
Step 3: Check if the battery can be charged properly.
Step 4: Check if the power button on the heated apparel can initiate preheating.
Step 5: Check if the power button can cycle through different heating levels.
Step 6: Check if you can feel obvious heat on the heating zones of the heated apparel.
Step 1: Identify your heated apparel and its compatible battery pack.
Heated Gear |
Compatible Battery Pack |
What's Included |
|---|---|---|
|
Heated Clothing (From Year 2023) |
 |
|
|
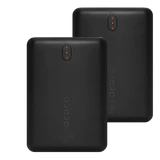
Heated Clothing (From Year 2020) |
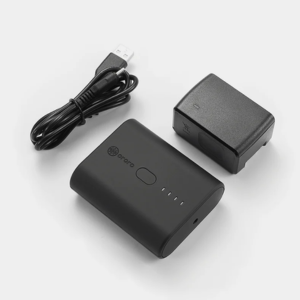 Mini 5K Battery Pack |
|
|
Heated Clothing (Before Year 2020) |
 B19G Battery Pack |
|
|
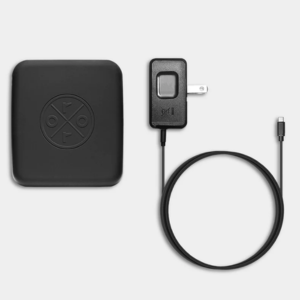
Heated Accessories |
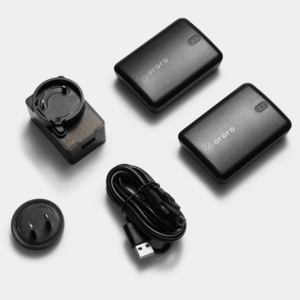 B22A Battery Pack |
|
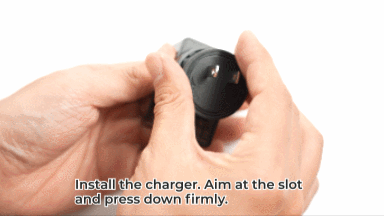
*Charger is not provided for products from Oct 2023. For charger that comes with B22A batteries, please assemble the charger before use. The assembly steps are as follows:
🔍 Learn More
How to distinguish between different types of chargers?
How to distinguish your charging cables?
How to distinguish the various ports and their usage on your battery?
Step 2: Check if the charger and cable are functioning properly.
1. First, inspect the appearance of the charger and cable for any noticeable damage, cracks or other issues. Do not use damaged accessories.
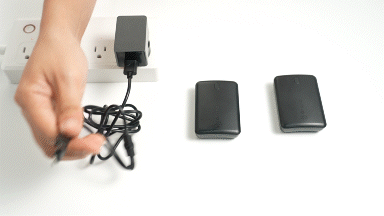
2. Then, insert the USB port of the charging cable into the charger, and plug the entire charger into the power outlet. Ensure that the connections between the charging cable, charger, and power outlet are firm and steady.
3. Try using the charger and cable to charge your battery or mobile device. If it's not working, please contact customer service for assistance.
Step 3: Check if the battery can be charged properly.
1. First, inspect the battery casing for any noticeable damage, swelling, or loose ports. Do not use a damaged battery.
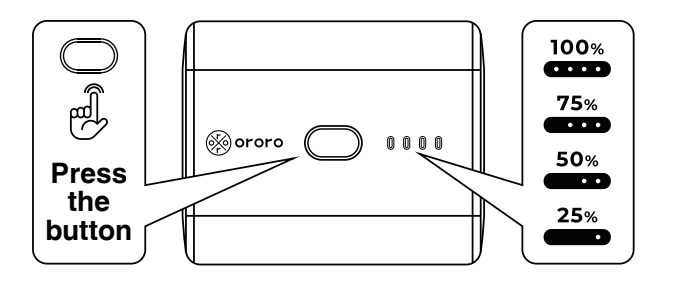
2. Press the button on the battery and check if the indicator lights up. The number of illuminated indicator lights represents different power levels. If none of the indicator lights on your battery illuminate, it may indicate that your battery is completely depleted, and you need to charge it first to check the battery level.
For Mini 5K/B19G batteries, connect the Type-C interface of the battery to the charging cable of the charger (refer to Step 2). At this point, the indicator lights on the battery will flash in sequence once and then continue to flash at the position representing the current battery level (if your battery is completely depleted, the indicator lights will start flashing from the first light; when the battery reaches 25% charge, the first light will remain steady, and the second light will start flashing, and so on). The indicator lights will continue flashing until the battery is fully charged to 100%, at which point all four lights on the battery will remain steady.

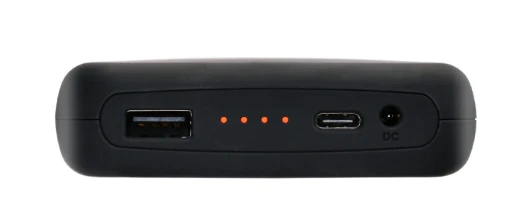
For the B22A battery pack, connect the Micro ports of the batteries to the charging cable of the charger (refer to Step 2). The indicator lights on the battery will continuously flash at the position representing the current battery level (if your battery is completely depleted, the indicator lights will start flashing from the first light; when the battery reaches 33% charge, the first light will remain steady, and the second light will start flashing, and so on). The indicator lights will continue flashing until the battery is fully charged to 100%, at which point all three lights on the battery will remain steady.
3. When all lights on the battery turn steady after charging, unplug the battery from the cable and press the button on the battery to double-check the power level. If all the lights remain steady, it indicates that your battery is fully charged, and you can proceed with the next step of troubleshooting.
Battery Pack |
Mini 5K + 5V3A Charger |
B19G + 5V2A Charger |
B22A + 5V3A Charger |
|---|---|---|---|
|
Charging Time |
3-4 Hours* |
6-8 Hours |
3-4 Hours* |
|
Full Charge Indicators |

|
|
|
*Note: Mini 5K batteries and B22A batteries require a 5V3A charger for fast charging. If you use a 5V2A charger, the charging time will be approximately 6-8 hours. B19G batteries do not support fast charging and will take 6-8 hours to charge.
If you meet any problems with the battery when charging*, you can try using a different ORORO plug and charging cable to repeat the above tests. If the battery still cannot be fully charged after repeating the tests, please contact customer service for support.
Common battery charging issues may include the following situations:
- The battery indicator lights do not illuminate at all.
- The battery indicator lights do not illuminate in the correct sequence (e.g., the first and third lights are on, while the second light is off).
- All the battery indicator lights are flashing simultaneously.
- After reaching the full charging time (e.g., 10 hours), the battery indicator lights continue to flash without being fully charged.
- After being fully charged, the battery indicator lights are steady, but one of the lights goes off once the charger is unplugged.
🔍 Learn More
Why does my battery drain quickly even after being fully charged?Why does the working time of my battery decrease?
Why is my battery gets hot during charging?
Step 4: Check if the power button on the heated apparel can initiate preheating.
- Ensure that your battery has sufficient remaining power, then connect the battery to the connecting wire inside the inner battery pocket of the heated apparel.
- Locate the power button on your heated apparel. Press and hold it for 3-5 seconds to initiate preheating*. When you see a red flashing light on the power button, it indicates that the preheating starts, and you can release the button and wait for preheating.

- When the power button stops flashing, it means that preheating is complete (generally takes 3-5 minutes), and your heated apparel will automatically switch to the medium level, showing a steady white light.
- If the power button can successfully activate preheating, you can proceed with the next step. If it fails to start pre-heating, you can try using another ORORO battery (if available) and repeat the above test. If the preheating still cannot be activated, please contact our customer service for assistance.
*Note: Heated socks 3.0/Heated Socks 3.5/ Heated Socks 4.0 do not have the preheating function. If you have purchased heated socks, you can directly press and hold the heating button for 5 seconds, and the power button will light up with a steady red light, indicating that the heating is activated.
Step 5: Check if the power button can cycle through different heating levels.
After preheating is complete, please short press the power button on apparel to see if it can cycle through the high level (red light) - medium level (white light) - low level (blue light)*. If you can smoothly switch between the heating levels by pressing the power button, you can proceed with the next step. If you can not switch between heating levels, please contact customer service for assistance.
*Note: Heated socks 3.0 can only maintain the high-level heating for 15 minutes before automatically adjusting to the medium-level, providing you with a more comfortable and longer-lasting warming experience.

Step 6: Check if you can feel obvious heat on the heating zones of the heated apparel.
Please keep the heated apparel on high-level heating (red light) and zip up the clothing for 3-5 minutes. Then, touch the heating zones on the inner lining of the heated apparel and feel the warmth from each heating zone*. If you can not feel any warmth in the designated heating zones, please contact customer service for assistance.
*Note: We recommend conducting this test indoors to ensure a more accurate perception of warmth. In environments with excessively low temperatures or when the heated apparel is unzipped, heat dissipation may accelerate, which could affect your experience.

🔍 Learn More
Functions of the Heating Button on ApparelWhy do I feel that my heated clothing is not warm enough?
Why do I feel that my heated clothing is not as warm as before?
If your product problem is still unsolved after troubleshooting, please contact customer service for further assistance. We will be happy to provide you with more help and support.